A laptop that is plugged in and not charging is a serious problem, as it can seriously delay work and cause unnecessary stress. It’s something we don’t encounter very often, but sometimes our laptops just refuse to cooperate. Sometimes, the laptop does not charge even when it is plugged into a power source. When this happens, and you need to complete your work in an emergency, you really can’t afford to go to the hardware store for repair. This requires some quick thinking and handy tips to help you repair your laptop and get it charging again, so you can complete the task.
How to fix a laptop plugged in but not charging in Windows
If you know the right way, it is not difficult to solve the problem of a laptop not charging when plugged in. Sometimes, your laptop lacks synchronization between the battery and charger, so it won’t charge even when plugged in. You can try removing the charger and resetting the laptop to let it start charging. This works in most cases, but sometimes you need a more complex and time-consuming solution. Here are some easy ways to resolve this issue, allowing you to charge your laptop and get back to work.
1. Plug in and unplug your AC charger
When you notice that your laptop is plugged in but not charging, unplug the AC charger and wait a few seconds. Plug the charger in again, and it should start charging; a few seconds are enough to realign the battery and charger.
2. Uninstall and reinstall the AC adapter and battery driver
Sometimes, battery and adapter drivers need to be reinstalled because they stop working properly, resulting in the laptop battery not charging even when a charger is plugged in. To do this effectively, you should follow these steps in the correct order:
1. Plug the charger into your laptop, then press Windows and R simultaneously. The Run window will open.
2. A box will open, where you will need to type ‘devmgmt.msc’ in the blank space and press Enter.

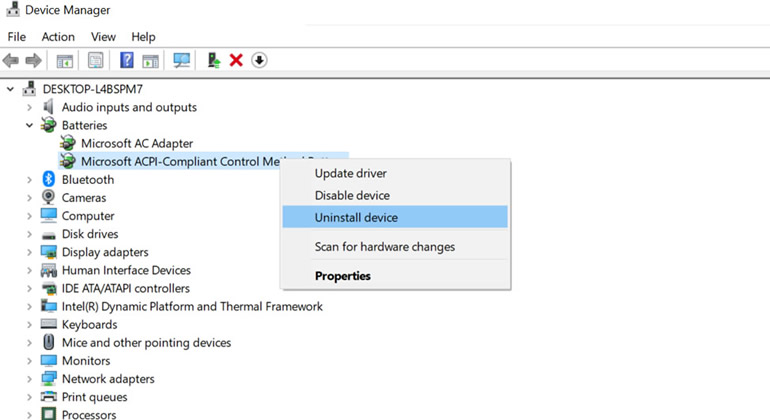
3. Device Manager will open on the screen. Click on Batteries, and once the settings have expanded, right-click on Microsoft ACPI Compliant Control Method Battery and then click Uninstall.
4. Once the uninstallation process is complete, wait for a few seconds and remove the battery from your laptop.
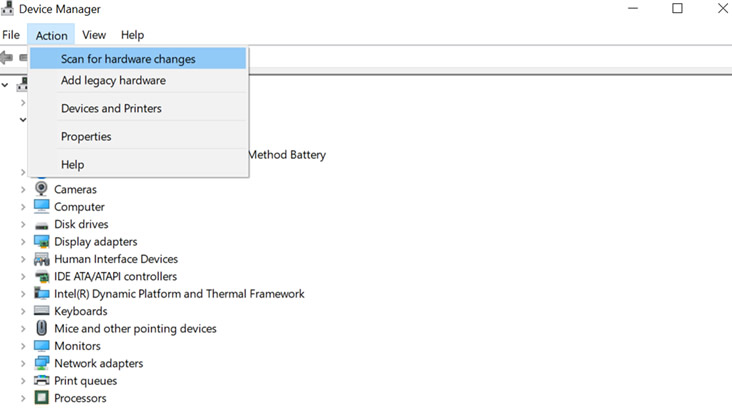
5. Wait 10 seconds, then replace the battery and plug the charger in. Then, go to Device Manager and select ‘Scan for hardware changes’. It will scan the laptop, and after completing the battery scan, it will suggest reinstalling the battery driver.
6. Reinstalling the battery drivers will take some time, and you have to restart your laptop. This will resolve any issues, and the laptop will begin charging.
3. See if the AC adapter is working
If your laptop’s AC adapter stops working, you may also experience a problem with the battery not charging. You can remove the battery or disconnect the battery cable from the motherboard and plug the AC adapter into your laptop. Then, start the laptop and check if it boots up. If so, there is nothing wrong with your adapter. It is working properly.
4. Check the DC Jack
Sometimes the AC adapter works fine, but the problem is with the DC jack. A DC jack is a small power socket located on the side of your laptop where you can plug in an AC adapter. Check if it is loose, causing poor contact with the adapter plug. You can also check it with a multimeter. If it displays the correct number for your device, you can continue using it. However, if it doesn’t, you will need to have it repaired.
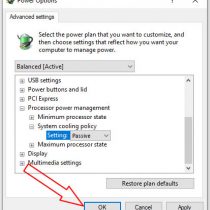
5. Change the settings of the power management software
Nowadays, most laptops have a new charging system, which can sometimes be the reason why they won’t charge. But you can easily fix this issue by disabling the battery time extender on your computer. To do this, simply open the power management software on your laptop and adjust its settings to normal mode.
Also Read: How to Replace a CMOS Battery on a Desktop and Laptop
6. Replace the battery
If you have tried all the above methods and the problem of your laptop not charging when plugged in persists, then you need to consider this ultimate method. You will need to replace the battery with a new one, as it is likely to have stopped working properly and is blocking the charging process. Replacing the battery is the last option, but sometimes it is the only solution.
So don’t worry if your laptop is plugged in but not charging. Try these simple solutions and your laptop will charge easily!


Thank you! Thank you so much! I tried the 1st option, and it helped!