As Meizu’s latest flagship phone, the Meizu 16 is powered by a Qualcomm Snapdragon 845 processor. This phone adopts a copper pipe for heat dissipation, which brings it better heat dissipation performance and guarantees games run more smoothly and more stably. Besides, there have been some changes in its appearance and design. The smartphone features a 3D four-sided curved glass back cover instead of a metal back plate. In the meantime, the phone’s body thickness is 7.3mm. Therefore, the Meizu 16 becomes the slimmest smartphone with the under-screen fingerprint reader on sale. Today, let’s start the teardown of the flagship to explore its internal structure and workmanship.

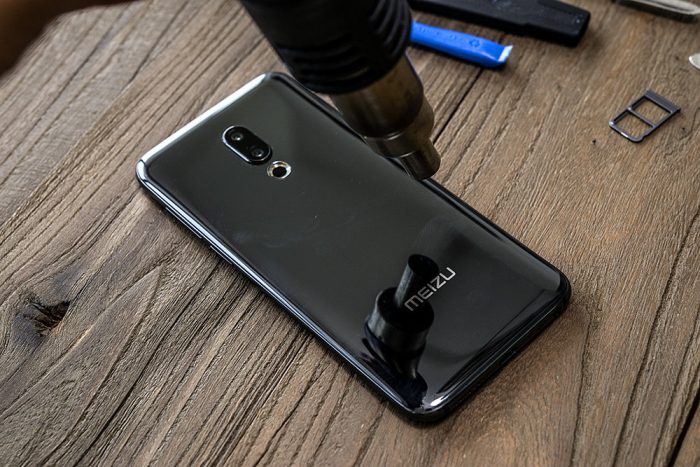
This phone features a glass back cover, which is fixed to the phone body with glue. Therefore, use a heater to heat up when removing the back cover. When the glue gets molten, the back cover can be removed.

After heating the phone, use a plastic clip to separate the back cover from the body. Be careful not to damage the back cover when removing it.

After removing the back cover, the smartphone’s internal structure can be seen. The PCB is covered by a plastic plate.

It adopts the classic three-stage internal design. The top part is the motherboard, the middle is the battery, and the small board is at the bottom.

The nanometer-grade seven-layer PVD technology is applied to the back cover, which enables it to deliver a ceramic texture.

The PCB can be seen after removing the cover used to protect the small board at the bottom. The PCB is mainly responsible for connecting all kinds of ports and external speakers.

This small board also connects the linear motor, the mEngine, aiming to achieve a better vibration effect.

The phone still features the mEngine design, but it has been upgraded with new algorithms that provide better feedback on heartbeat, roller simulation, and music vibrations.

The protective cover is also placed on the top PCB.

Remove the cover on the motherboard, and then the motherboard can be seen.

The shield cover of the motherboard is covered by the graphite sticker, which can transfer the heat the motherboard generates to the phone body.

After taking out the motherboard, we can see the heat pipe in the middle frame. The heat-conducting silicone grease is applied to the CPU on the motherboard.

Its battery can also be removed. It has a capacity of 3010mAh and supports 24W fast charge technology.

After the motherboard and battery are removed, the phone’s middle frame can be seen. It is made of aluminum alloy, which is quite light. At present, many smartphones use this material for their middle frame.

There is an aperture in the middle frame. Here is the under-screen fingerprint reader. Meizu intentionally rotates the fingerprint read sensor with 13.7 degrees to erase moiré.

The heat pipe is embedded in the middle frame. To increase the heat dissipation area, a copper sheet is designed where the heat pipe meets the CPU. Meizu has customized the heat pipe, which has a thickness of 0.4mm. The vapor inside the heat pipe will take away the heat generated on the motherboard at critical temperature. The vapor will liquefy when the temperature drops. In this way, the phone will have better heat dissipation performance.

Except for aluminum alloy, the phone’s middle frame also contains copper foil. The copper foil can absorb heat from the motherboard to achieve a good heat dissipation effect.

The earphones are placed in the top slot. This design suits Meizu’s simple and symmetric style.

All the shield covers on the motherboard can be removed, which makes the shield cover thinner, but in the meantime, it also makes the phone more difficult to repair.

The main components on the back of the motherboard include the CPU and the power modules. These shield covers are also covered by graphite stickers, and they can’t be removed.

Uncover the heat-conducting sticker in the CPU area. We can see that silicone grease is applied to the CPU. This design is to improve the heat dissipation effect.

After removing the silicone grease, the CPU can be seen. This phone is powered by a Qualcomm Snapdragon 845 processor. The processor and the memory chip are stacked together. Therefore, we can only see the memory chip. The CPU is soldered below the memory chip. This double-stack design saves more room for the PCB.

These are the proximity sensor and the light sensor.

The smartphone comes with a 20MP front shooter for selfies. Meizu has customized the smallest front camera in the world since its forehead is 7mm long. The world’s smallest front camera lets the phone own this ultra-narrow design on its forehead.

This phone features a 12MP and 20MP dual camera setup on the rear. It also utilizes the loop LED to improve picture quality. Meanwhile, it adopts the Sony IMX380 and IMX350 sensors, which can provide triple lossless zoom and bokeh effects. The Meizu 15 also uses the IMX380 sensor. The phone can provide excellent picture quality with the IMX380 sensor and Snapdragon 845 SoC.

After the teardown, I found that the Meizu 16 boasts excellent workmanship and good components inside, the design on heat dissipation in particular. As for the heat dissipation design, a layer of copper foil is placed on the middle frame, the PCB are covered by graphite stickers, and the thermal grease is applied to the CPU. In the meantime, it also adopts a heat pipe to dissipate the heat. In addition, the phone’s stack design inside is used to reduce the thickness of the phone body so as to deliver a good hand feel. The Meizu 16 is worth buying because of its workmanship and components since it is priced at CNY 2699 ($391).


Thank you for the great and detailed review. Can you explain how to apply the glass back cover on the phone after it was taken apart?
Great job, I love this phone. I have a question: Do you know where the Test Point is located on the motherboard? I would like to unlock the bootloader.