The cooling fan in a laptop plays a very important role. When the user puts too much pressure on the processor and other related devices (while running heavy programs), it cools the processor and other related equipment. By default, it is mainly set to Auto Speed. If the user applies excessive pressure to the CPU, the speed of the cooling fan will increase, and you may hear fan noise. During normal use, it will be slow and almost quiet. There is no doubt that the lower CPU temperature will increase its lifespan.
For some users, the constant heating up of the CPU may not be important. They may prefer a noiseless fan. At the same time, low CPU temperatures may be a priority for some users, even if the fan is making noise (while running at high speed). That’s why today we’re bringing you a tutorial to explain three different ways to set the speed of your CPU fan.
Changing Fan Speed Through BIOS
The BIOS in a laptop is a program that plays an important role in controlling the hardware. In some laptops, users can set the speed of the cooling fan through the BIOS. You can easily access the BIOS settings by pressing a specific key (mentioned on the boot screen) at startup. Most laptops use function keys (F1-F12) to access the BIOS on the boot screen.
Once you’re in the BIOS, you can find the fan speed control option in the Advanced Settings or Configuration submenu. It depends on the manufacturer and model of your laptop. If it does, then you can change the system settings and force the fan to run at the desired speed.
Changing Fan Speed Through Windows Power Plan
Some laptops also have built-in thermal sensors and fan controllers, allowing users to control fan speed through Windows power plan settings. Users can select from various fan control modes.
First, open the notification area and select the power icon. Now click on “More Power Options” > “Change Plan Settings” > “Change Advanced Power Settings”. The Processor Power Management submenu will appear, and if your laptop has a built-in thermal sensor, you may see the “System Cooling Policy” option here.
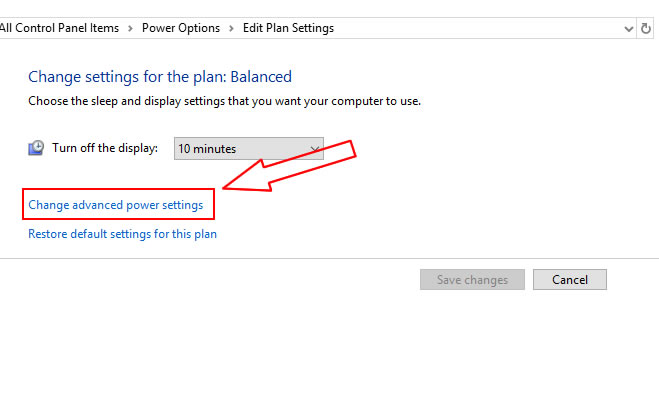
Selecting the “Active” option on this screen will make your fan run more frequently. At lower temperatures, selecting the “Passive” option will set the cooling fan not to run until the laptop’s CPU reaches a higher temperature.

Changing Fan Speed Through Third-Party Applications
Similarly, if your laptop has a thermal sensor and fan controller, you can also use a third-party app instead of the Windows built-in settings. Some well-known apps like ASUS FanXpert (for Windows) and smsFanControl (for Apple MacBook) allow you to monitor the temperature of your system and control the fan speed. These applications typically require the help of 4-pin fans that use pulse-width modulation voltages in response to temperature changes. It’s worth mentioning that many laptops don’t have a controllable cooling fan.
Also Read: How to Fix a Laptop Fan Making a Loud Noise
If you have any other questions regarding your laptop, we highly recommend visiting our tips section.


Absolutely right, Harris! The fan speed of a laptop plays a critical role in regulating its temperature and preventing overheating. This post contains in-depth information on improving the laptop fan speed.