Laptop fans play a crucial role in the laptop cooling system. When the temperature of the laptop rises, the fan starts spinning. However, if the laptop is not running any software and the laptop fan stays on, this may be due to system settings. Here’s how to fix a laptop fan that runs constantly.
Method 1. Change system settings
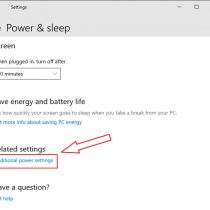
Let’s take Windows 10 as an example to show you how to set up a laptop power management plan to reduce the speed and noise of the cooling fan.
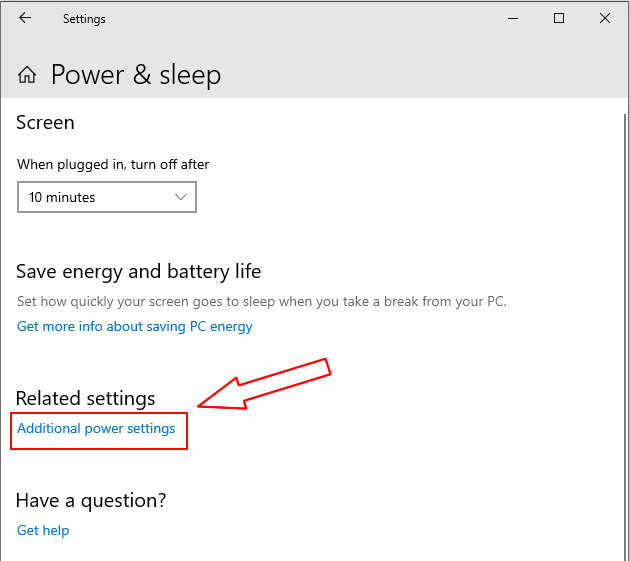
1. Windows 10 : Go to Start > Settings > System > Power & Sleep > Additional power settings
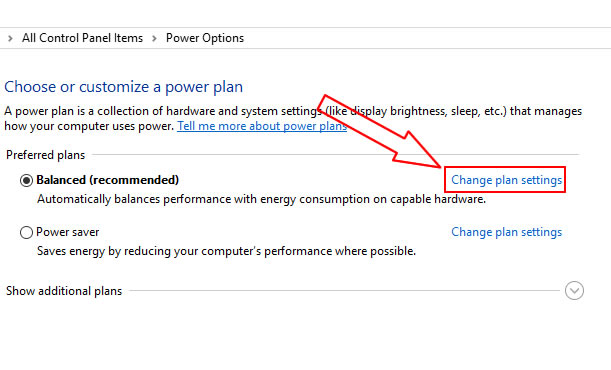
2. Click “Change plan settings” in the pop-up window.
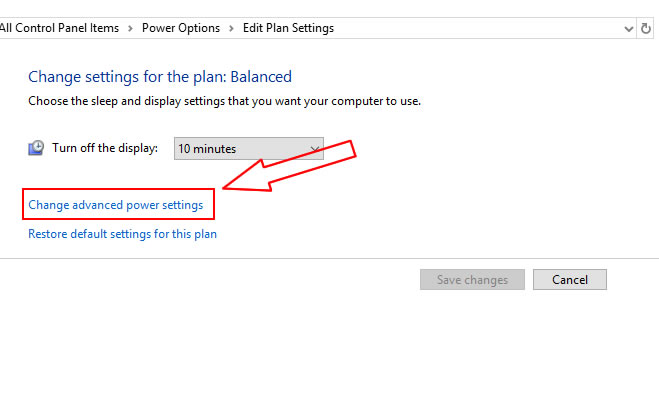
3. Click “Change advanced power settings” in the pop-up window.
4. Click “Processor power management”, and click “System cooling policy” in the drop-down menu, then click “Active”, change the “Active” to “Passive”, and click OK.

The setup is complete now. Then, the fan will run as needed instead of running constantly.
Also Read: How to Clean a Laptop Fan and Heatsink
Also Read: How to Fix a Laptop Fan Making a Loud Noise
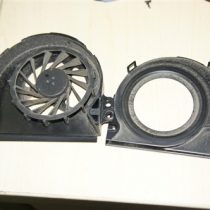
Method 2. Clean the laptop fan
If your “system cooling policy” has been changed to passive and you have not run large software, and the laptop fan is constantly running, you may need to clean the laptop fan because the fan and heat sink are dusty, which reduces their heat dissipation performance.
At this point, you will need to remove the bottom cover, then remove the laptop fan and heatsink. Use a brush to clean the dust from the fan and heatsink fins. You need to remove the old thermal grease from the CPU, GPU, and heatsink, then apply the new thermal grease to the CPU and GPU to improve thermal conductivity. Visit the laptop fan cleaning guidelines to learn how to clean your cooling fan. You can also get a new CPU fan from the parts store.
Helpful, I’ll see if it works!
(Worked for me)
I just wanted to thank you sincerely for such a concise and helpful guide! I dread looking up seemingly smaller issues like this because of all the fodder I usually have to sift through just to find some simple guidance.
Anyway, I appreciate it more than you know! Thanks again.
I don’t see the processor power management in my options
I didn’t see it either at first. Read it again to make sure you’re not missing something. I don’t have “Balance (recommended)”, but I do have “Dell (Automatically balances)”. Maybe the wording is a little different on your laptop.
Launch your registry editor and navigate to \HKEY_LOCAL_MACHINE\SYSTEM\CurrentControlSet\Control\Power\PowerSettings.
If you expand all of the sub-folders, click on any one of them, and you’ll see a “Description” and a “Friendly Name” that describe which advanced power setting option they control. Scroll through, read those descriptions, and find the settings that you want to be able to control in advanced power settings.
For each of these, find the “Attributes” REG_DWORD file and change its value to the number 2. That setting will now show up and can be controlled from your advanced power settings.
If you come across a setting that lacks the “Attributes” file, just create a new DWORD file called “Attributes” in that folder, set the value to 2, and it’ll likewise show up in your advanced power settings.
It’s a bit tedious to scroll through ~100 options, but I was able to fully customize my advanced power settings interface in about 30 minutes.
This really helps. Thanks a lot!
Thank you for this. I’ve only had this laptop for a few weeks and didn’t even know how to boot it. I was streaming video, then turned the laptop off and put it in my pack. An hour later, I heard the fan running inside the pack and couldn’t turn it off or turn the machine on. Your posting helped a lot. Cheers.
When I open the advanced power settings panel, the only options I see are desktop background settings, sleep, display, and battery. Other than that, it looks like the exact same panel, and I reached it by going through the exact same steps. Am I missing something?
Thank you! This worked!
Thank you! After hours of trying everything, THIS WORKED! Thank you again!
Big thanks to you
Another thing you can try is to unplug your printer from the laptop that was causing mine to run constantly.
None of these worked for me. I even changed the thermal grease. The CPU fan still runs loudly all the time.
The same for me.
Thank you!
I am also not able to see that option. Please let me know how to do it on an HP laptop.
This guide only applies to Windows 10; if your system is not Windows 10, you may not find the options in the guide.
I’ve set the cooling policy to passive, left the fan cleaner than a surgical ward, disabled every possible process that won’t crash my computer, uninstalled unnecessary apps, disabled ALL background applications, disabled Windows update settings, tried Speedfan, and in my insanity, I even held a plastic ice block under the vent for a prolonged period of time, and the fan STILL WON’T STOP.
I’ve looked through countless guides and tried what seems like everything. I’m running Windows 10. I don’t know what else to do.
As always, none of these settings work; the freaking suction at HP has made it so that any power management settings get totally ignored, and the fan comes on regardless!